How to quickly capture a task
The GTD concept of an inbox suggests: if something comes to your mind that you might want to act on in the future, throw it into an inbox without having to deal with any details. You can come back to it and make decisions about it later.
Inbox
Inbox is ideal for your initial "brain dump". It is the place where you initially drop in all new, unsorted data: thoughts, ideas, tasks, etc. It is also a place to send tasks using the Rapid Text Entry window.
Once items have been placed in the Inbox in MLO, you can then access them either from the dedicated Inbox view or the special Inbox folder within the All Tasks view.
From there, you can manage your Inbox items:
- all the additional propertiesfor each task (due date, context, etc.).
- move it to another branch in your task hierarchy.
Learn how to quickly capture tasks into your MLO Inbox or directly in Outline with the options below.
Inbox view
You can open the Inbox view and add your tasks there:
Tip: you can assign a hotkey to quickly access the Inbox view: right-click on the view name → Assign hotkey.
Since ideas strike anytime and anywhere, you may need to use other tools for a quick task capture. Try Rapid Task Entry and Task by Email to send a task to MLO while working on other things.
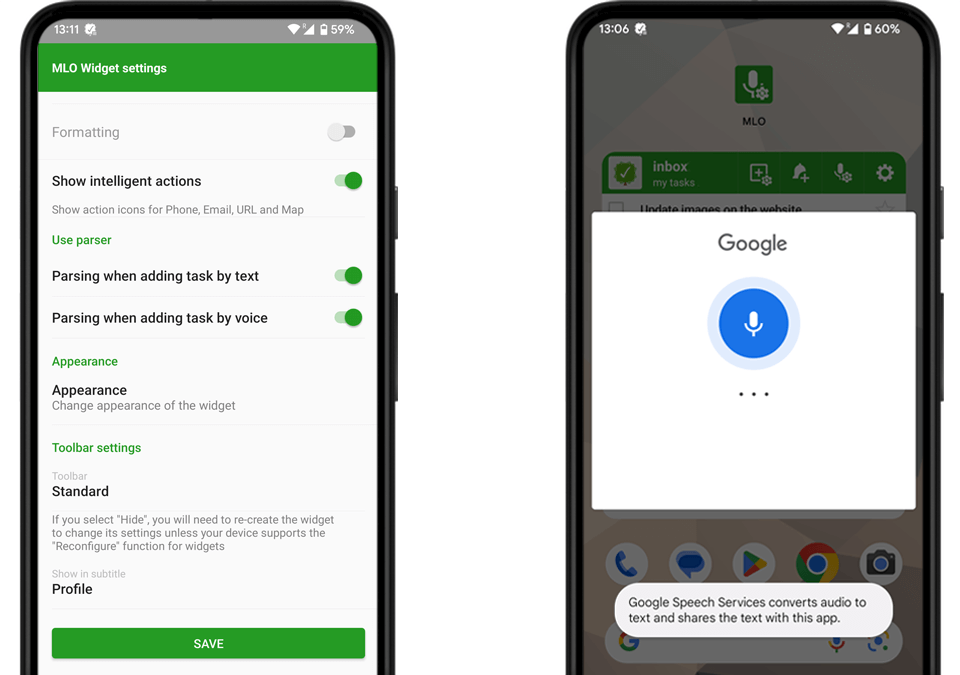
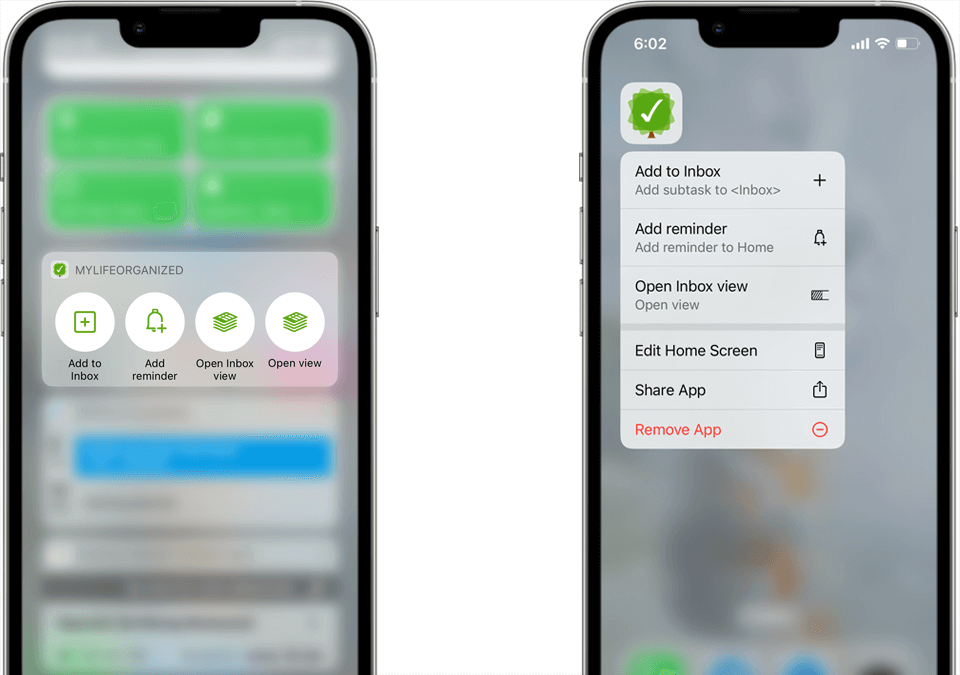
Tip: Most of the time, your phone is the only tool. Use widgets and shortucts in MLO on Android and iOS to capture ideas on the go.
Task by Email
You can add items to your MLO Inbox by sending an email to a special email address created in your MLO Cloud account. It will be sent to the Cloud in the background and pushed to all connected devices on sync. The email title becomes the task and the email body is placed to notes. The detailed description can be found in this article.
Rapid Task Entry
Use Rapid Task Entry (RTE) to swiftly input tasks, even while working in other applications. It can be accessed from the MLO tray icon and via the hotkey Shift Ctrl M. You can also find it in the menu under View → Rapid task entry window.
Multiple task entry
Need to capture to Inbox many tasks at once? Check the "Multiple task entry". In this mode, each text line will be interpreted as a separate task when you press the Add task(s) button. You can use indentation to create subtasks.
Single task entry
Uncheck the "Multiple task entry" checkbox to have only one task added to Inbox when you press the "Add task" button. If the text you entered has more than one line, the first line will be used for the task name and the entire text (including the first line) will be placed in the task note.
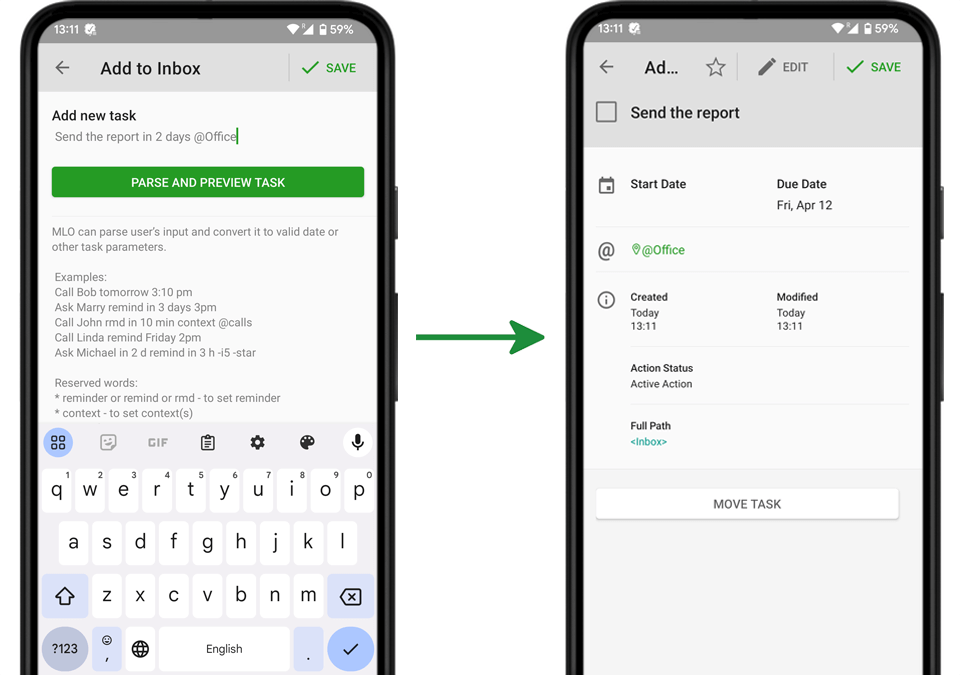
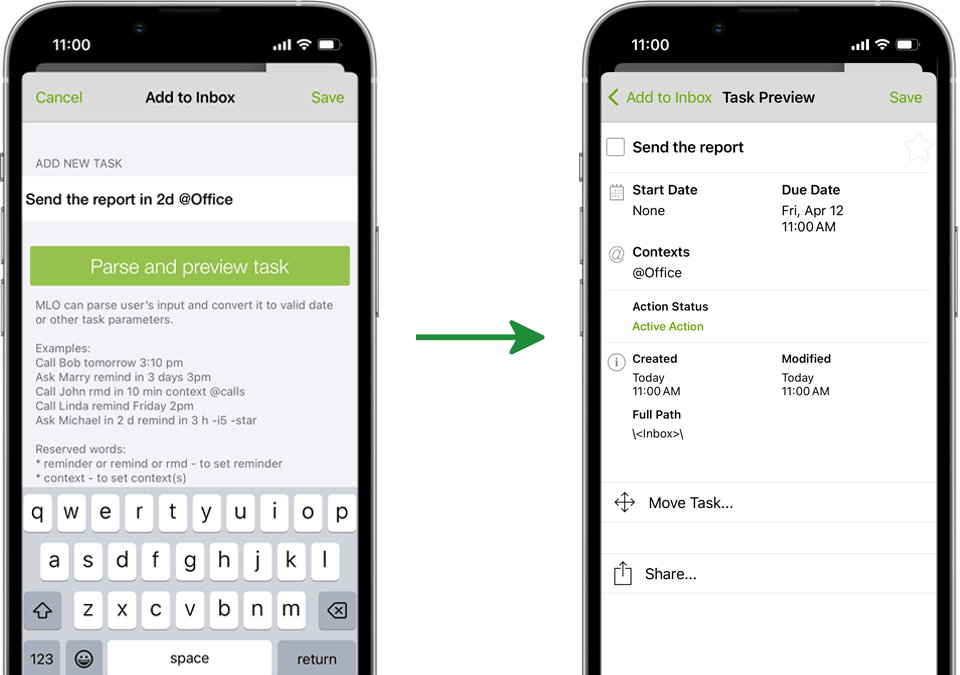
Input parsing
You can type in all your task information — task name, start and due date, context, etc — into a single field. The built-in input parsing tool will automatically convert it into a task with the ready-made properties. Check "Parse input like..." to use this feature.
Supported syntax
Below you can find the reserved keywords for adding specific tasks by text.
| Description | Syntax | ||
|---|---|---|---|
| Sets a reminder | Reminder, remind me, remind, rmd | ||
| Assigns a context | Context, cont, @ | ||
| Days of week, date and time in local format | Monday, Mon Tuesday, Tue Wednesday, Wed Thursday Thu Friday, Fri Saturday, Sat Sunday, Sun |
||
| Special days | today, tomorrow | ||
| Periods | in X days, in X d, in X min, in X h, in 1 y | ||
| Puts a star | -* -star |
||
| Sets a Start Date | -start -s |
||
| Sets a Due Date | -due -d |
||
| Hides a task in To-Do | -h | ||
| Enables ‘Complete subtasks in order’ | -o | ||
| Sets Importance | -i1 to -i5 | ||
| Sets Urgency | -u1 to -u5 | ||
| Sets Effort | -e1 to -e5 | ||
| Turns a task into a project | -p | ||
| Turns a task into a folder | -f | ||
| Sets a flag | -fl<FlagName> or -fl=<FlagName> Example: 'Call Tom -flRed' |
||
| Sets a goal (for a week, month, year) | -gw, -gm, -gy Example: 'Send a report -gw' |
||
| Sets a text tag | -tag Example: 'Send a report -tagTom' |
||
| Sets font color | -c<Color> Example: 'Send a report -cr' will set font color to red |
||
| Sets min time required | -t | ||
| Sets max time required | -tm | ||
| Sets lead time for the task | -l Example: "Edit video -l3d4h" |
||
| Moves to a specific parent task | -to<TaskName> or -to=<TaskName> |
||
| Moves to a specific folder | -tofld<FolderName> or -tofld=<FolderName> Example: 'Paint wall -tofldHome' |
||
| Moves to a specific project | -toprj<ProjectName> or -toprj=<ProjectName> Example: 'Paint wall -toprjRenovation' |
||
| Putting the phrase in quotes prevents from parsing the keywords |
"Remind Tom about the payment" tomorrow 2pm |
||
Note. Moving a task to another task, folder, or project only works with a one-word task name.
Other examples of the supported syntax:
Prepare report for Bob 3:10am 5/22
Prepare report for Bob 15:10 22/5 tomorrow 4pm
Organize party with my friends May 28th 2021 reminder May 23 2021 3pm
Send report to Bob in 3 days remind me tomorrow 2 pm
Call Jim tomorrow context @office; @calls
Send report next Tue 11am  context ProjectX
Send report in 1 month 2 weeks 1 day @ ProjectX; Reports
Send report in 1 m 2 w 3 d
Call Sam -flRed
Ask Michael in 2 d remind in 3 h -i5 -star
"Inform about meeting with Bob April 10 2pm" tomorrow at 16:00 remind me 10 min
You can learn more about input parsing in our manual.
How to manage Inbox
Once you have everything captured, it's time to clarify and organize your Inbox items.
Follow the GTD two-minute rule: if it takes less than two minutes, then do it now. The rest should have additional classifying details like date due, context, reminder etc. and appropriate place in your task tree.
There are several ways you can move tasks out of Inbox:
- In the All tasks view you can drag Inbox items into other folders or projects as needed to keep everything properly structured.
- Open the Inbox view and hit
F3. A helper window will open showing your inbox task list which it’s great for drag and drop. Bring up the Outline (or All Tasks) view in the main window. Select the task(s) in the helper window then drag them to the main window and drop them onto the target folder. - Select the tasks you want to move then right-click on them, select "Move to" from the context menu, select the target folder from the popup window and click OK. To speed this up use a shorcut —
CtrlM. - Select a task or tasks and use the buttons
←→↑↓on the MLO toolbar to move the tasks where you want them.
Tip: If the task tree is collapsed, drag the task to the destination branch and hold the mouse for a second — the next level of nesting will open.
If you don't follow GTD, you can ignore Inbox and put new items directly in a folder/project where they belong. However, in this case the items may be not carefully thought out. Give Inbox a try and see if it works for you.
Parsing in Outline
When adding tasks directly in Outline, you can include additional details right away. Simply type in the task information using the supported syntax and press AltEnter – it will be automatically converted into a task with ready-made properties.